Alle Beiträge von AdminFD

Simple bag of words

What: Using bag of words to categorize text
Why: Build your own chatbot or classify documents
How: Using scikit-learn and pandas

Introduction

Bag of words is a simple classification approach which looks at the occurrence of (key) words in different classes of documents (the bags). The document which should be classified is assigned to the class, where the best mach is found between the document words and the words within the matching bag.

scikit-learn is a python machine learning library with a very nice concept for handling data from preprocessing to model building: Pipelines.

pandas is a python library which helps storing data in table like objects. It makes the handling of data within python much easier.

The following is inspired by the scikit-learn documentation.

Code

For bag of words, a text has to be tokenized, the words have to be stemmed and a classification has to be build. nltk is used for text processing. The used SnowballStemmer is also able to handle german as long as the german module is downloaded. If you don’t mind the space, you can download all nltk data with:

sudo python3 -m nltk.downloader all
import nltk
from sklearn.feature_extraction.text import CountVectorizer
from sklearn.feature_extraction.text import TfidfTransformer
from sklearn.model_selection import GridSearchCV
from sklearn.linear_model import SGDClassifier
from sklearn.pipeline import Pipeline
import pandas
import logging
import warnings
# Supress some sklearn warnings
warnings.filterwarnings("ignore", category=FutureWarning)

class ModelBuilder():
    __stemmer=None
    
    def __init__(self, language):
        self.__stemmer=nltk.stem.SnowballStemmer(language)
        logging.basicConfig(format='%(asctime)-15s %(message)s')
        self.__logger=logging.getLogger('ModelBuilder')
    
    # Taken from: https://stackoverflow.com/q/26126442
    def __stem_tokens(self, tokens, stemmer):
        stemmed = []
        for item in tokens:
            stemmed.append(stemmer.stem(item))
        return stemmed

    # Taken from: https://stackoverflow.com/q/26126442
    def __tokenize(self, text):
        tokens = nltk.tokenize.WordPunctTokenizer().tokenize(text)
        stems = stem_tokens(tokens, stemmer)
        return stems
    
    def buildModel(self, data):
        # Taken from: http://scikit-learn.org/stable/auto_examples/model_selection/
        # grid_search_text_feature_extraction.html#
        # sphx-glr-auto-examples-model-selection-grid-search-text-feature-extraction-py
        pipeline = Pipeline([
            ('vect', CountVectorizer()),
            ('tfidf', TfidfTransformer()),
            ('clf', SGDClassifier()),
        ])

        parameters = {
            'vect__max_df': (0.5, 0.75, 1.0),
            'vect__ngram_range': ((1, 1), (1, 2)),  # unigrams or bigrams
            'clf__alpha': (0.00001, 0.000001),
            'clf__penalty': ('l2', 'elasticnet'),
            'clf__max_iter': (1000,),
            'clf__tol': (1e-3,),
            # Modified huber allows getting probabilities for the classes out. 
            # See predict_proba for details
            'clf__loss':('modified_huber',)
        }

        # find the best parameters for both the feature extraction and the
        # classifier
        grid_search = GridSearchCV(pipeline, parameters, n_jobs=-1, verbose=False)

        grid_search.fit(data.Text, data.Class)
        self.__logger.info("Best score: %0.3f" % grid_search.best_score_)
        self.__logger.info("Best parameters set:")
        best_parameters = grid_search.best_estimator_.get_params()
        for param_name in sorted(parameters.keys()):
            self.__logger.info("\t%s: %r" % (param_name, best_parameters[param_name]))

        return grid_search.best_estimator_

The code can be tested via the following snippet, which can be embedded as self test in the same script, where the ModelBuilder class is defined.

import unittest
 
class TestModelBuilder(unittest.TestCase):
    
    def setUp(self):
        self.__out=ModelBuilder('english')
        
        self.__testdata=pandas.DataFrame(columns=['Text', 'Class'])
        self.__testdata.loc[self.__testdata.shape[0]]=["Hello", "greeting"]
        self.__testdata.loc[self.__testdata.shape[0]]=["Hi", "greeting"]
        self.__testdata.loc[self.__testdata.shape[0]]=["How are you", "greeting"]
        self.__testdata.loc[self.__testdata.shape[0]]=["Bye", "farewell"]
        self.__testdata.loc[self.__testdata.shape[0]]=["Goodbye", "farewell"]
        self.__testdata.loc[self.__testdata.shape[0]]=["See you", "farewell"]
 
    def test_buildModel(self):
        classifier=self.__out.buildModel(data)
        classifier.predict(["See you"])
        self.assertEqual('farewell', classifier.predict(["See you"]))
        self.assertEqual('greeting', classifier.predict(["Hello"]))
 
suite = unittest.TestLoader().loadTestsFromTestCase(TestModelBuilder)
unittest.TextTestRunner().run(suite)

Instead of english, you can also use ‚german‘ as language but you need different test data. Please note, this is a simple example. For a real world use case you need more categories and examples.

The classifier can output instead of the class probabilities for classes, which may help with determining the quality of the classification in case of data which was not included in the model train data.

Usage

Create your test data or read it from file into a pandas data frame and build the model:

classifier=ModelBuilder(<language>).buildModel(<data>)

Once this is done, use it to classify unknown documents:

documentclass=classifier.predict([<text>])
documentclassProbabilities=classifier.predict_proba([<text>])
German cities list

What: Extract a list of german cities and countries from wikipedia
Why: Get a list of german cities for text processing
How: Using Beautifulsoup, Requests and Python

Introduction

Wikipedia contains a list of german cities and towns. This list is formatted in html and needs to be processed for further automatic processing. Additionally, for each city the country is mentioned.

Code

Below is the python code for extracting the list. The url and the processing of the page specific search via Beautifulsoup is hard encoded. The wikipedia page uses a 2-letter encoding for the countries, which is mapped to the full country name.

import requests
from bs4 import BeautifulSoup

class CityList:
    def __init__(self):
        self.__countries={
            'BY':'Bayern',
            'BW':'Baden-Württemberg',
            'NW':'Nordrhein-Westfalen',
            'HE':'Hessen',
            'SN':'Sachsen',
            'NI':'Niedersachsen',
            'RP':'Rheinland-Pfalz',
            'TH':'Thüringen',
            'BB':'Brandenburg',
            'ST':'Sachsen-Anhalt',
            'MV':'Mecklenburg-Vorpommern',
            'SH':'Schleswig-Holstein',
            'SL':'Saarland',
            'HB':'Bremen',
            'BE':'Berlin',
            'HH':'Hamburg'
        }
        
    def retrieveGermanList(self):
        r = requests.get('https://de.wikipedia.org/wiki/Liste_der_St%C3%A4dte_in_Deutschland')
        soup = BeautifulSoup(r.content, "html5lib")
        
        cities={}
        tables=soup.find_all('table')
        for t in tables:
            lis=t.find_all('dd')
            for l in lis:
                # All countries are in brackets after the city name.
                # Some cities are listed like: SN, Landeshauptstadt
                countryShort=None
                additional=l.contents[1].split('(')[1].split(')')[0].strip()
                if ',' in additional:
                    countryShort=additional.split(',')[0]
                else:
                    countryShort=additional
                cities[l.find('a').contents[0]]=countries[countryShort]
                
        return cities

The code can be tested via the following snippet, which can be embedded as self test in the same script, where the CityList class is defined.

import unittest

class TestCityList(unittest.TestCase):
    
    def setUp(self):
        self.__out=CityList()

    def test_retrieveGermanList(self):
        self.assertEqual('Sachsen', self.__out.retrieveGermanList()['Dresden'])
        self.assertEqual('Sachsen', self.__out.retrieveGermanList()['Görlitz'])
        self.assertEqual('Bayern', self.__out.retrieveGermanList()['München'])
        self.assertEqual('Hamburg', self.__out.retrieveGermanList()['Hamburg'])

suite = unittest.TestLoader().loadTestsFromTestCase(TestCityList)
unittest.TextTestRunner().run(suite)

Usage

Use it from within python:

CityList().retrieveGermanList()

The output will be something like:

[...,
'Vohenstrauß': 'Bayern',
'Neuötting': 'Bayern',
'Eggenfelden': 'Bayern',
'Gernsheim': 'Hessen',
'Braunsbedra': 'Sachsen-Anhalt',
'Tegernsee': 'Bayern',
...]

Debugging in Jupyter notebook

What: Debugging directly in a Jupyter notebook while it is executed
Why: Faster/more secure development
How: Using ipythons build-in debug functionality

Note: The following is a modified version of the following blog entry: https://kawahara.ca/how-to-debug-a-jupyter-ipython-notebook/.

Insert debug statement

The following line needs to be inserted at the location in a cell where you want to start debugging:

from IPython.core.debugger import Pdb; Pdb().set_trace()

Start debugging

Execute the cell. You will get a debug prompt. It behaves like an ipython shell. The following commands can be used to operate the debugger:

  • q: Quit and stops the programm execution
  • c: Continue to the next breakpoint
  • n: Go to the next line

Happy debugging!

Docker on Raspbian

What: Getting Docker running without hassle on raspberry3
Why: Using Docker images on raspberry
How: Using arm version of docker and standard apt-functionality

This is an extract from the docker documentation, which worked for me on a raspberry3 with raspbian jessie.

Install requirements

1
2
3
4
5
6
7
sudo apt-get update
sudo apt-get install \
     apt-transport-https \
     ca-certificates \
     curl \
     gnupg2 \
     software-properties-common

Prepare installation

1
2
3
4
curl -fsSL https://download.docker.com/linux/debian/gpg | sudo apt-key add -
echo "deb [arch=armhf] https://download.docker.com/linux/debian \
     $(lsb_release -cs) stable" | \
     sudo tee /etc/apt/sources.list.d/docker.list

Install

1
2
sudo apt-get update
sudo apt-get install docker-ce

Test

1
sudo docker run armhf/hello-world

Update Eclipse (from Neon to Oxygen)

What: Updating Eclipse without new installation
Why: Beeing up to date
How: Using update site and Oomph-Settings

Setting up Oomph

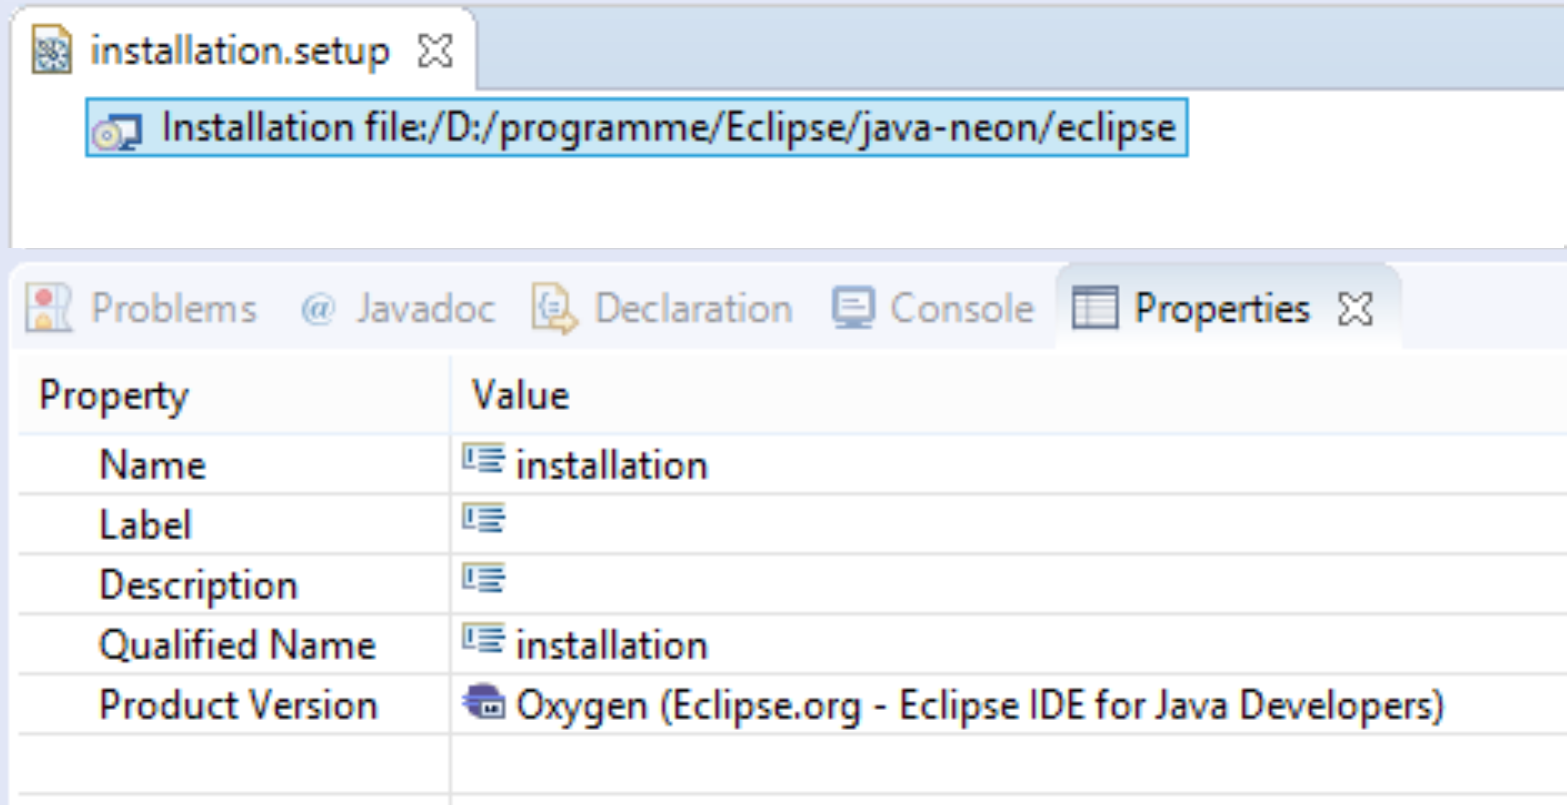
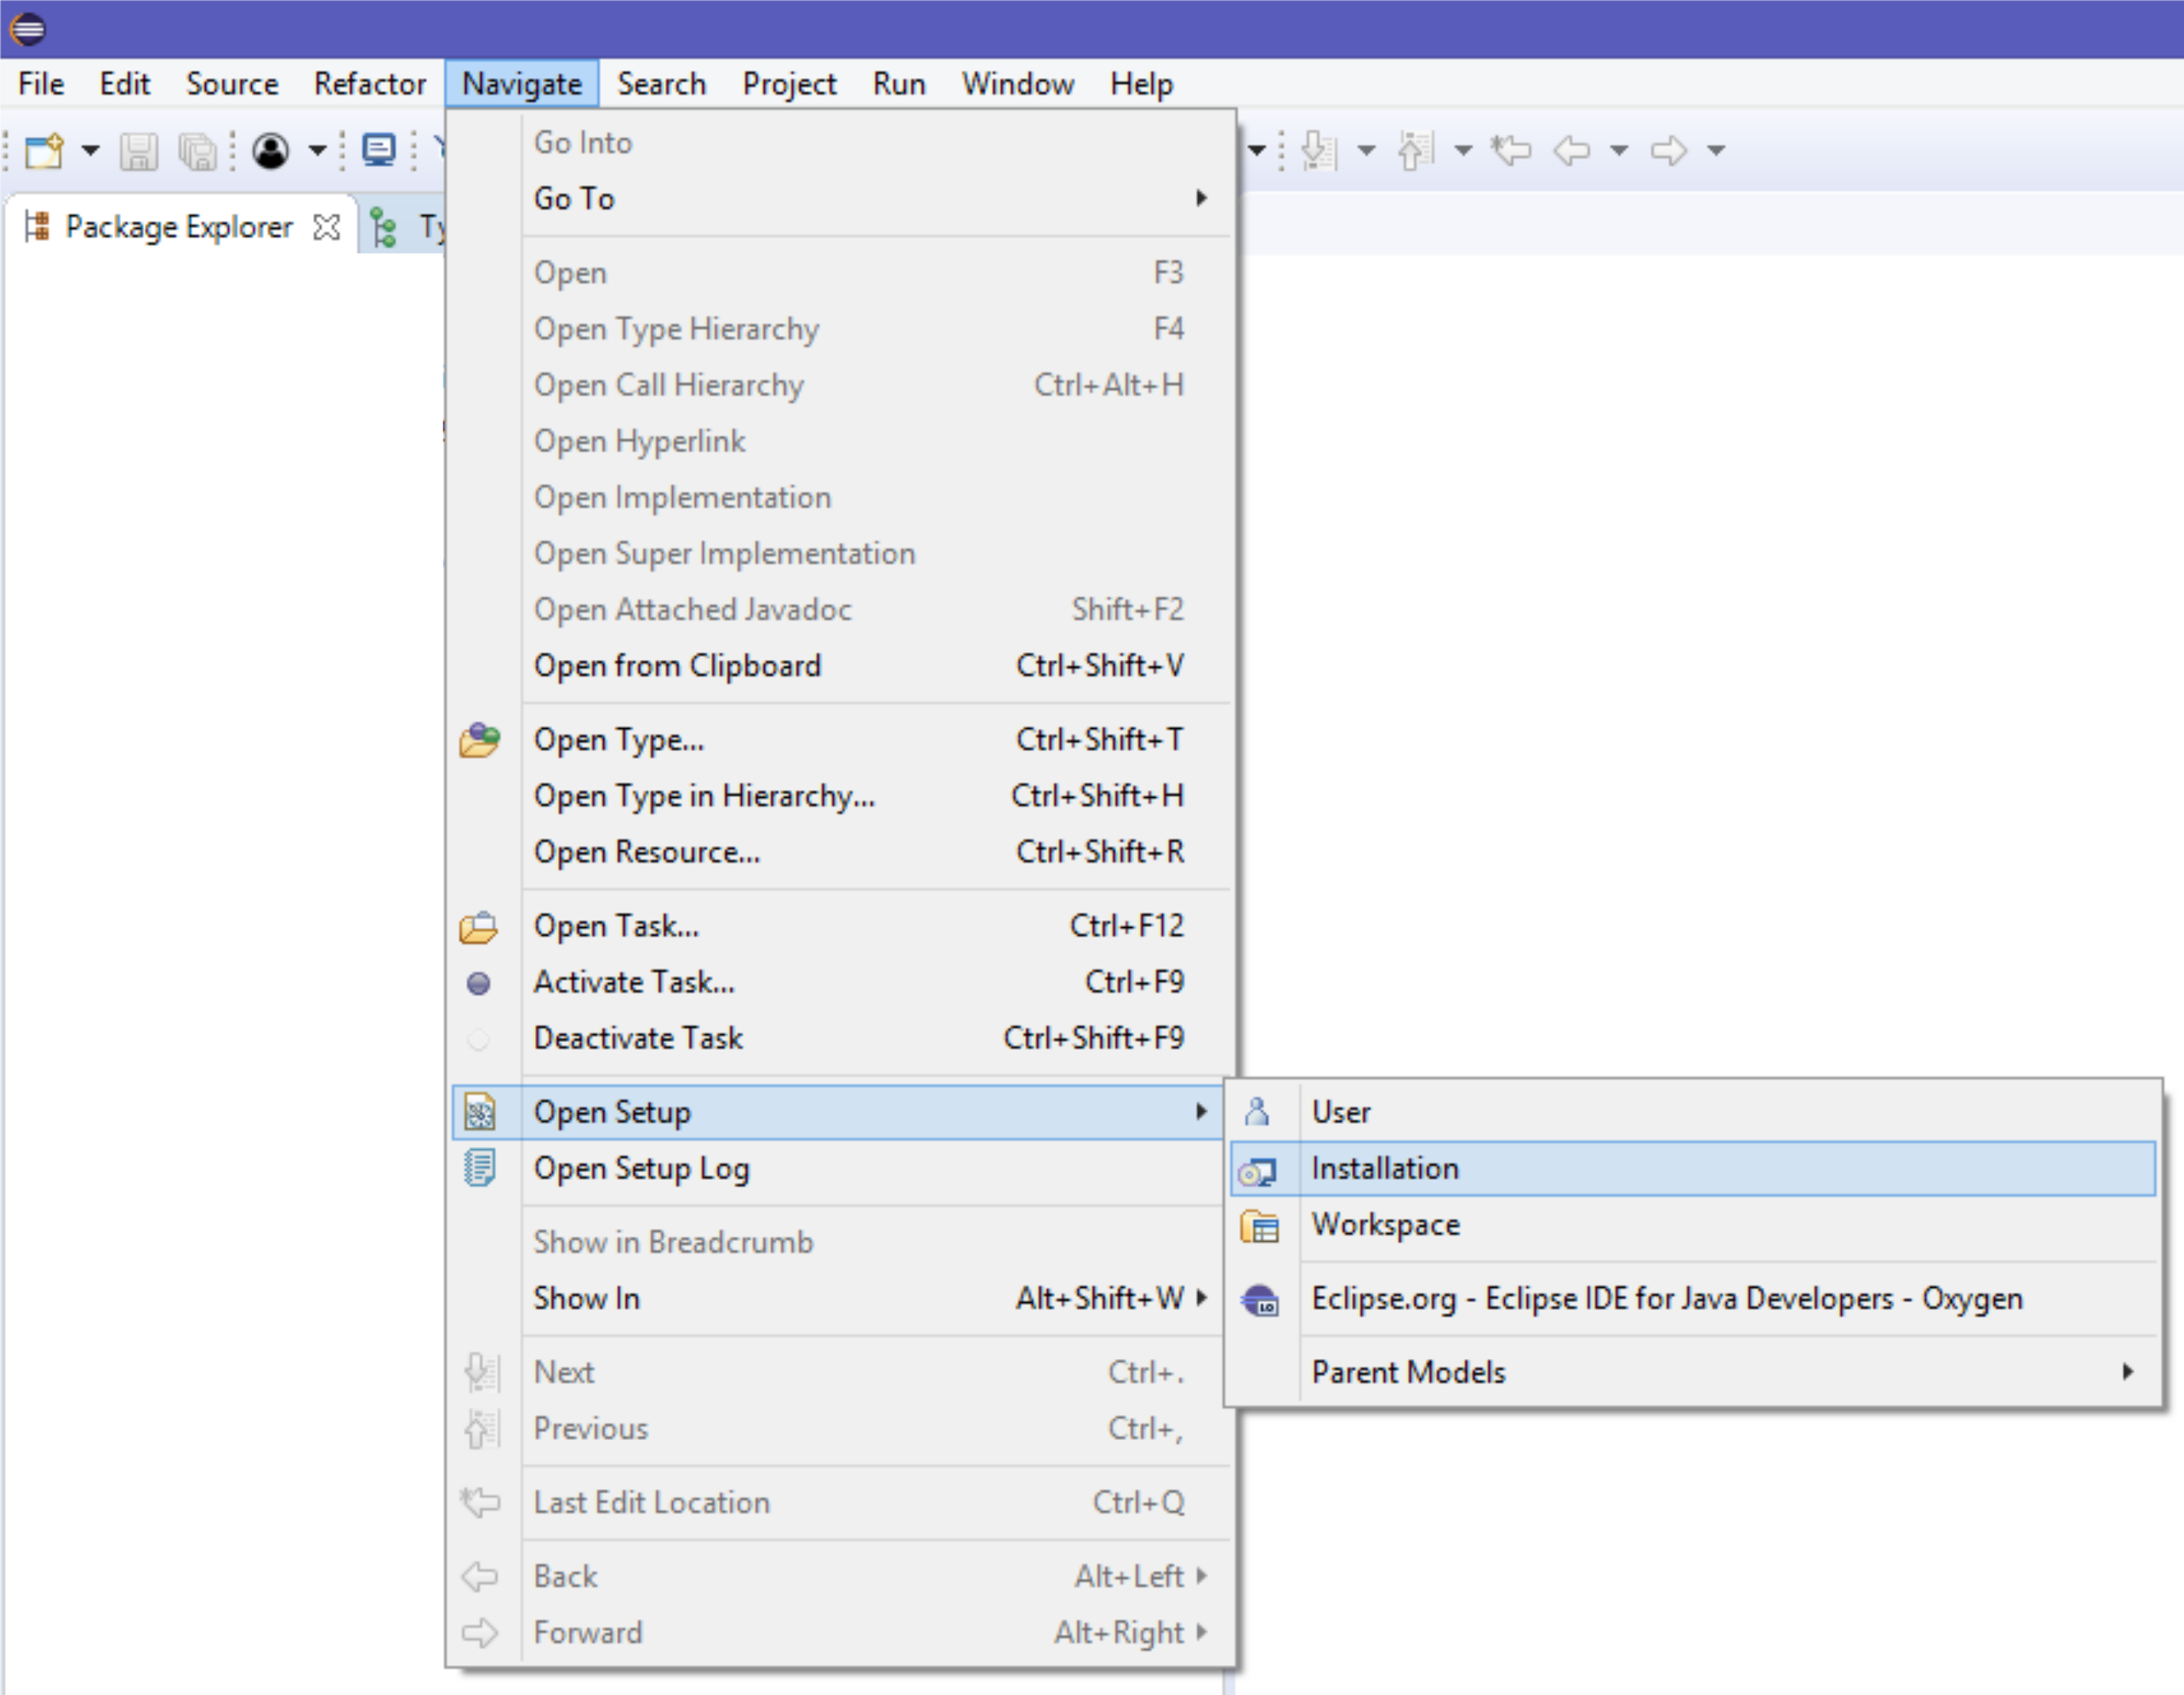
The first step is to tell Oomph, which version of Eclipse should be used. Select from the menu: Navigate Open SetupInstallation.

A new tab should open with the installation object. Select it and open properties view. Change the product version of Eclipse in the drop down menu to Oxygen.

Adding Update site for oxygen

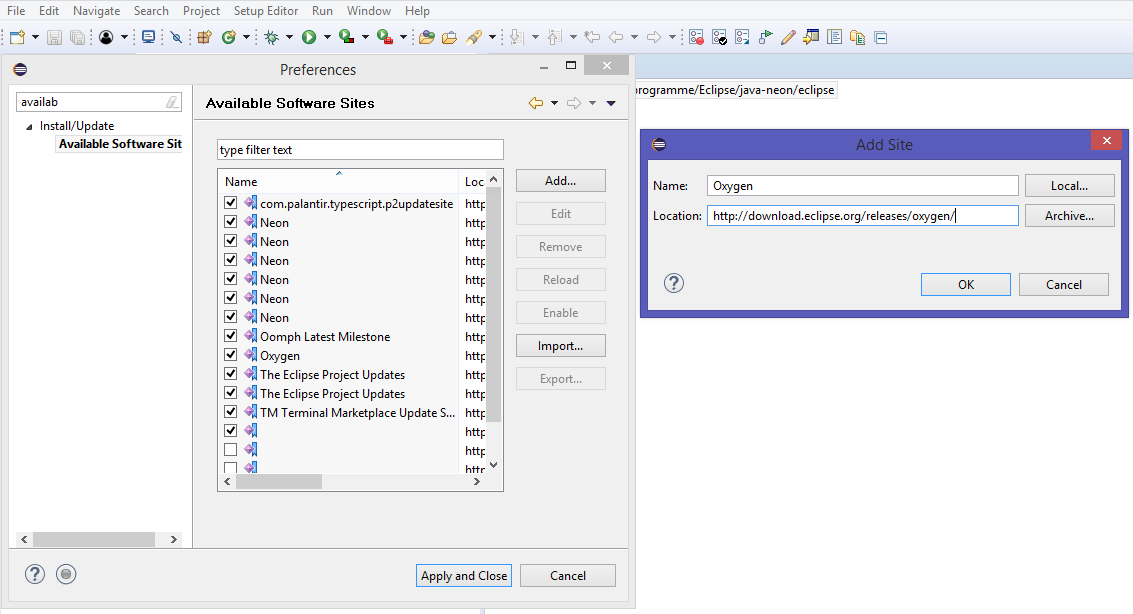
The second step involves adding the Oomph update site. Select from the menu: WindowPreferences and open Install/UpdateAvailable Software Sites. Add a new site with the oxygen repository (http://download.eclipse.org/releases/oxygen/).

Click Apply and Close.

Update

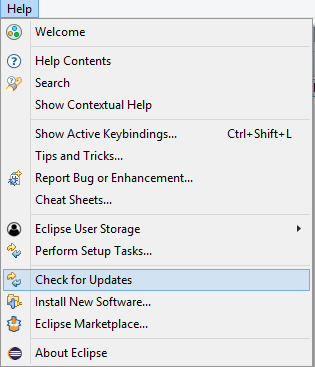
Update via the standard Eclipse update mechanism. Select from the menu: HelpCheck for Updates.

Perform the update as normal and restart. The Eclipse version starting should now be Oxygen.

Links

What: A list of not-now useful links
Why: Limited memory 😉
How: –

Tools

Vagrant

Resize vagrant disks

Virtual Box

Resizing virtual box disk space, the easy way
GParted live image

Install guest additions in Ubuntu

sudo apt-get install virtualbox-guest-dkms

Java

https://developers.redhat.com/blog/2017/03/14/java-inside-docker/

Ember

https://medium.com/@ruslanzavacky/ember-cli-fingerprinting-and-dynamic-assets-797a298d8dc6

Docker

https://developers.redhat.com/blog/2017/03/14/java-inside-docker/

Docker an iptables

Sound recording

http://www.upubuntu.com/2013/05/how-to-record-your-voice-from.html

Machine learning

deeplearnjs

Programming

Ternary numbers

Python 3 program to convert a decimal number to ternary (base 3)

Data

General

Pandas data profiling

Conversion

Convert audio to base64

Linux

Go back to older kernel after update

Add a second hard drive (also working for vms)

Ubuntu not starting to graphical mode, flickering

Hang at boot on old machines

See https://www.youtube.com/watch?v=ZZBTSUbzT0g.

Add acpi=force in /etc/default/grub in line GRUB_CMDLINE_LINUX_DEFAULT and apply settings:

sudo update-grub

Ubuntu

If you would like to use a usb serial connection (for example to connect an ESP32), make sure the linux-modules-extra is installed (which is not the case in default cloud versions of Ubuntu). You can install it via:

sudo apt install linux-modules-extra-$(uname -r)

See also: https://askubuntu.com/a/1129260.

Windows

Links to user folders

1. Copy folder to new location
2.

mklink /J "absolute path to old location" "absolute path to new location"

Show symbolic links

dir /AL /S "folder"

See also: https://superuser.com/a/496155

VCS

Git

Beautiful log

git config alias.lg "log --graph --pretty=format:'%Cred%h%Creset -%C(yellow)%d%Creset %s %Cgreen(%cr) %C(bold blue)<%an>%Creset' --abbrev-commit --date=relative"

Use it like:

git lg --all

Development

Joels Test

Hallway test

Python https server

Creating self-signed SSL certificates with OpenSSL

Serial console

https://www.cyberciti.biz/hardware/5-linux-unix-commands-for-connecting-to-the-serial-console/

Client – Server

Get server certificate

See: https://superuser.com/a/641396.

openssl s_client -showcerts -connect server.edu:443 /dev/null|openssl x509 -outform PEM >mycertfile.pem

Systemd

https://wiki.ubuntuusers.de/Howto/systemd_Service_Unit_Beispiel/

https://www.freedesktop.org/software/systemd/man/systemd.service.html

Activate caching for client side on apache2

Enable apache module:

1
2
a2enmod headers
sudo systemctl apache2 restart

Create .htaccess file in the specific directory (adjust max-age to the number of seconds you want the resource to be cached):

<IfModule mod_headers.c>
<FilesMatch "\.(gif|ico|jpeg|jpe|png|css|js)$">
Header set Cache-Control "max-age=86400, public"
</FilesMatch>
</IfModule>

Set different port in apache2

See: https://stackoverflow.com/a/26064554.

Images

Identify image format

1
identify -format "%wx%h %C"

For format options see: ImageMagick.

Resize image

1
convert  -resize x\&gt;

IoT

Raspberry and Ubuntu

Install Ubuntu on Raspberry

https://ubuntu.com/download/raspberry-pi

Getting audio to work over hdmi

Add the following line to /boot/firmware/usercfg.txt and reboot:

1
dtparam=audio=on

Increase gpu memory

Add the following line to /boot/firmware/usercfg.txt and reboot:

gpu_mem=128

Mosquittos on the couch

What: Put mosquitto messages to the couch
Why: Using mosquitto broker as relay between your IoT devices and a database backend
How: Use mosquitto, curl and some linux magic

Requirements

You need couchdb (assumming it runs locally on port 5984 for this example) and mosquitto (also assuming it runs locally for this example). If you dont have it on your system, have a look at my other blog entry. Additionally, you need curl and the bash.

Set up a simple publisher

Create a simple script test.sh, which will publish messages periodically to the mosquitto broker under the topic test:

counter=0
while true; do
    sleep 3
    mosquitto_pub -t test -m "$counter"
    counter=$(($counter+1))
done

Change the permission for this script in such a way that you can execut it.

Create a test database

curl -X PUT http://localhost:5984/testdb

Connect mosquitto and couch via curl

Mosquitto and couchdb can be connected via a simple shell pipe:

mosquitto_sub -t test | while read line;do curl -H 'Content-Type:application/json' -d "{\"date\":\"$(date +%Y-%m-%dT%H:%M:%SZ)\", \"value\":$line}" http://localhost:5984/testdb;done &

Note: You could think about piping mosquitto directly to couch, if your message is already a json string. Something like this:

mosquitto_sub -t test | while read line;do curl -H 'Content-Type:application/json' -d -http://localhost:5984/testdb;done

This will not work, because curl starts reading the input after it is complete (after the stream from mosquitto is closed). You need the while read line construction like shown above.

Run the test publisher script and verify results

Run the script:

./test.sh

Wait some seconds. Now query the database and you should have some documents there:

curl http://localhost:5984/testdb/_all_docs?include_docs=true

The result should look like:

{"total_rows":8,"offset":0,"rows":[
{"id":"13e93448d1256a98a3fa76f889000414","key":"13e93448d1256a98a3fa76f889000414","value":{"rev":"1-589430e0693f8f209655122fa934c440"},"doc":{"_id":"13e93448d1256a98a3fa76f889000414","_rev":"1-589430e0693f8f209655122fa934c440","date":"2017-06-08T20:47:01Z","value":0}},
{"id":"13e93448d1256a98a3fa76f889000bab","key":"13e93448d1256a98a3fa76f889000bab","value":{"rev":"1-0ebf14c49eab17f786c5f03c7c89acbb"},"doc":{"_id":"13e93448d1256a98a3fa76f889000bab","_rev":"1-0ebf14c49eab17f786c5f03c7c89acbb","date":"2017-06-08T20:47:04Z","value":1}},
{"id":"13e93448d1256a98a3fa76f8890010ee","key":"13e93448d1256a98a3fa76f8890010ee","value":{"rev":"1-8ded0d7b84da764a9fbe3d51bf27db6c"},"doc":{"_id":"13e93448d1256a98a3fa76f8890010ee","_rev":"1-8ded0d7b84da764a9fbe3d51bf27db6c","date":"2017-06-08T20:47:07Z","value":2}},
{"id":"13e93448d1256a98a3fa76f889001e53","key":"13e93448d1256a98a3fa76f889001e53","value":{"rev":"1-d2f32251185308fbca46873999022bfd"},"doc":{"_id":"13e93448d1256a98a3fa76f889001e53","_rev":"1-d2f32251185308fbca46873999022bfd","date":"2017-06-08T20:47:10Z","value":3}},
{"id":"13e93448d1256a98a3fa76f88900238e","key":"13e93448d1256a98a3fa76f88900238e","value":{"rev":"1-307f1ccd43f10642bddf3f8bf5f4646a"},"doc":{"_id":"13e93448d1256a98a3fa76f88900238e","_rev":"1-307f1ccd43f10642bddf3f8bf5f4646a","date":"2017-06-08T20:47:13Z","value":4}},
{"id":"13e93448d1256a98a3fa76f8890032ae","key":"13e93448d1256a98a3fa76f8890032ae","value":{"rev":"1-47d81b8b99058883550ba27088474e70"},"doc":{"_id":"13e93448d1256a98a3fa76f8890032ae","_rev":"1-47d81b8b99058883550ba27088474e70","date":"2017-06-08T20:47:16Z","value":5}},
{"id":"13e93448d1256a98a3fa76f889003c49","key":"13e93448d1256a98a3fa76f889003c49","value":{"rev":"1-33a785b3a53e9b80f4aedc19f0dc5bc8"},"doc":{"_id":"13e93448d1256a98a3fa76f889003c49","_rev":"1-33a785b3a53e9b80f4aedc19f0dc5bc8","date":"2017-06-08T20:47:19Z","value":6}},
{"id":"13e93448d1256a98a3fa76f889004701","key":"13e93448d1256a98a3fa76f889004701","value":{"rev":"1-63238f12e3b566a2329ef60afbd663e2"},"doc":{"_id":"13e93448d1256a98a3fa76f889004701","_rev":"1-63238f12e3b566a2329ef60afbd663e2","date":"2017-06-08T20:47:22Z","value":7}}
]}

Make a small animation based on existing images

What: Concatenate images to a video
Why: Small animation as logo, simple stop and go movie
How: Using ffmpeg to concat existing images into mp4 file

Requirements

The following is using ffmpeg in debian linux. There are also builds for other platforms available. Depending on the platform you maybe have to install the codec. The following is tested with a default debian system.

Install ffmpeg with:

1
apt-get install ffmpeg

Create some images

Create a sequence of images. Lets assume we want to have a spinning wheel of the following kind for this tutorial:


The important point is the numerical ordering of the image names like img1.png, img2.png, ….

Create the video

Create the video according to the documentation (assuming an image numbering like mentioned above):

1
ffmpeg -i %d.png -pix_fmt yuv420p output.mp4

The above command works because there are less than 10 images. If you have another image numbering (for example 001-999) you have to change the pattern:
– img%02d.png for 01-99
– img%03d.png for 001-999
– …

The final result will look like:

Useful ansible roles

What: Using Ansible to setup a development system with Couchdb and Docker
Why
: Having a phoenix like dev setup
How: Using Ansible and some simple roles to provision the system

Requirements

You need a system, where Ansible is installed on. In case you don’t have it at hand, you can use the following Vagrantfile to set it up:

Vagrant.configure("2") do |config|
  config.vm.box = "debian/jessie64"
  config.vm.synced_folder ".", "/vagrant", type: "virtualbox"

  config.vm.provision "shell", inline: <<-SHELL
    echo "deb http://ppa.launchpad.net/ansible/ansible/ubuntu trusty main" >> /etc/apt/sources.list
    sudo apt-key adv --keyserver keyserver.ubuntu.com --recv-keys 93C4A3FD7BB9C367
    sudo apt-get update
    sudo apt-get install -y ansible
  SHELL
end

Preparing the playbook

Lets set up a simple playbook. Because something is installed, become is needed to install as root. Create a file called playbook.yml with the following content (there are more roles in the repository, but these should be enough for the beginning):

1
2
3
4
5
6
7
8
9
10
11
- name: playbook
  hosts: all
  become: true
  
  roles:
    - install-dockerce
    - install-docker-py
    - install-couch
    - install-java8
    - install-maven
    - install-vim

The roles

Clone the following git repository and change to the directory usefulansibleroles. Copy the roles-folder next to your playbook file.

Note: The install-couch role will install couchdb via docker (see https://hub.docker.com/r/klaemo/couchdb/) in version 2.0. Docker will be setup to restart couchdb at every boot.

Run playbook

Run the playbook. You can use a hosts file at /etc/ansible/hosts or run it locally:

ansible-playbook -i "localhost," -c local playbook.yml

Test

Connect to the provisioned machine. The following commands should give you correct results:

java -version
mvn -version
vim
sudo docker run hello-world
curl http://localhost:5984

Using weather forecast data of DWD for Europe

What: Extracting weather forecast data from DWD grib2 files with Java
Why: Using weather forecasts in your (Java) applications
How: Download the data from DWD and using NetCDF for parsing

Getting the data

The data (in the following, the 3-day forecast is used) is freely available via ftp from here. You have to register with a valid EMail.

There are several different data sets on the server. The interesting one is the ICON model. It contains forecasts with 0.125 and 0.25 degree resolution for wind, temperature, precipitation and more. You find the data under the path /ICON/grib/europe.

There is a list of available content for the ftp server here.

The data is published in 6hour intervalls at 5, 11, 17 and 23 o’clock. Each file is a zipped grib2 file.

For this tutorial, download and unzip the file /ICON/grib/europe/ICON_GDS_europe_reg_0.250×0.250_T_2M_[yyyyMMddhh].grib2.bz2 (replace the date) which contains the temperature 2 meters above ground and unzip it.

Parsing the data

You can find the full example here. Clone the repository, change to weatherforecastdata directory and adapt it to your needs (hard coded file name, …). After you have finished your changes run:

1
mvn clean package && java -jar target/weatherforecastdata-1.0-SNAPSHOT-jar-with-dependencies.jar

If you want to build it from scratch (it is simple) create a maven project and add the following repository and dependency to your pom.xml:

1
2
3
4
5
6
7
8
9
10
11
12
13
14
<repositories>
    <repository>
        <id>artifacts.unidata.ucar.edu</id>
        <url>https://artifacts.unidata.ucar.edu/content/repositories/unidata-releases/</url>
    </repository>
</repositories>
 
<dependencies>
    <dependency>
        <groupId>edu.ucar</groupId>
        <artifactId>netcdfAll</artifactId>
        <version>4.6.8</version>
    </dependency>
</dependencies>

NetCDF is able to read in the grib files. You can create a new instance of the data file via:

1
NetcdfFile dataFile = NetcdfFile.open("filename");

Each file contains dimensions, attributes and variables. The variables depend on the dimensions. For example: The temperature value depends on the latitude and longitude as well as on time and height above ground. The data can be retrieved in arrays, with the shape depending on the corresponding dimensions. Latitude, longitude, time and height above ground are 1-dimensional arrays while the temperature depends on all of them and thus is 4-dimensional.

You can get dimensions, attributes and variables via:

1
2
3
List<Dimension> dimensions = dataFile.getDimensions();
List<Attribute> globalAttributes = dataFile.getGlobalAttributes();
List<Variable> variables = dataFile.getVariables();

Lets concentrate on the variables. For each variable you can get name, units and dimensions it depends on:

1
2
3
4
5
for (Variable variable : variables) {
    System.out.println(variable.getFullName());
    System.out.println(variable.getUnitsString());
    System.out.println(variable.getDimensions());
}

For the example above this will give for the temperature:

Temperature_height_above_ground
K
[time = 79;, height_above_ground = 1;, lat = 301;, lon = 601;]

There is a variable called Temperature_height_above_ground, which depends on time (there are 79 different values for the time dimension), height_above_ground (with just one different value because we look at the temperature measured at 2m above ground), latitude and longitude with (301/601 different values for the respective dimension).

This is enough information to retreive the data from the file:

1
2
3
4
5
ArrayDouble.D1 time = (ArrayDouble.D1) dataFile.findVariable("time").read();
ArrayFloat.D1 height = (ArrayFloat.D1) dataFile.findVariable("height_above_ground").read();
ArrayFloat.D1 lat = (ArrayFloat.D1) dataFile.findVariable("lat").read();
ArrayFloat.D1 lon = (ArrayFloat.D1) dataFile.findVariable("lon").read();
ArrayFloat.D4 temp = (ArrayFloat.D4) dataFile.findVariable("Temperature_height_above_ground").read();

Iterating over the temperature values can now be done by iterating over each of the dimensions:

1
2
3
4
5
6
7
8
9
10
11
for (int timeIndex = 0; timeIndex < time.getShape()[0]; timeIndex++) {
    for (int heightIndex = 0; heightIndex < height.getShape()[0]; heightIndex++) {
        for (int latIndex = 0; latIndex < lat.getShape()[0]; latIndex++) {
            for (int lonIndex = 0; lonIndex < lon.getShape()[0]; lonIndex++) {
                System.out.println(String.format("%f %f %f %f %f", time.get(timeIndex),
                    height.get(heightIndex), lat.get(latIndex), lon.get(lonIndex),
                    temp.get(timeIndex, heightIndex, latIndex, lonIndex)));
            }
	}
    }
}

Have fun with the amazing DWD source of weather forecast data.