Archiv der Kategorie: Python

Measure loudness with a USB micro on a raspberry pi

What: Measuring loudness with a simple USB microphone on a raspberry pi
Why: Create devices which are activated by a certain noise level
How: Use python and some python libraries to analyse the sound stream

Requirements

The following hardware was used for this setup:

The following os was used on the raspberry pi:

The following python version was used (preinstalled with the corresponding raspbian):

  • Python 2.7 (PyAudio was not working for me with Python3 easily)

Setup

Besides plugging the USB microphone in the corresponding USB port (such a surprise), the following things needs to be done.

Install PortAudio

Install the dependencies:

sudo apt-get install libasound-dev

Download the corresponding version (at the time of writing this is 190600_20161030) and uncompress it:

wget http://www.portaudio.com/archives/pa_stable_v190600_20161030.tgz
tar -xvf pa_stable_v190600_20161030.tgz

Build PortAudio from source:

cd portaudio
./configure && make
sudo make install
sudo ldconfig

Install NumPy, PyAudio and SoundAnalyse

pip install numpy
pip install PyAudio
pip install SoundAnalyse

Code

Below is the code I used for measuring. There are some caveats with measuring the loudness:

  • There are by default some warnings when opening the stream
  • When reading the bytes from the stream, there may be an overflow exception which will kill the script. This can be avoided by the parameter exception_on_overflow = False
  • The parameters for pyaud.open may be different depending on the used microphone. The parameters can be determined by iterating over the devices and use: pyaud.get_device_info_by_index(i)
1
2
3
4
5
6
7
8
9
10
11
12
13
import analyse
import numpy
import pyaudio
 
pyaud = pyaudio.PyAudio()
stream = pyaud.open(format = pyaudio.paInt16,channels = 1,rate=44100,input_device_index=2,input=True)
 
while True:
    raws=stream.read(1024, exception_on_overflow = False)
    samples= numpy.fromstring(raws, dtype=numpy.int16)
    loudness = analyse.loudness(samples)
    if loudness > -15:
        print "Really loud"

Feature engineering in python

What: Generating features for regression models in python based on formulas (like in R)
Why: Model notation in formulas and not in code => Better maintainability
How: Use patsy

Test data

Lets take as example a simple: fitting an exponential to some test data. First, some test data needs to be generated:

import numpy
import pandas

length = 40
linear = numpy.array(range(length))*20
quadratic = numpy.array([e**2 for e in range(length)])
intersect = 10
random = numpy.random.random(length)*40

df = pandas.DataFrame(
    {
        "y":  linear + quadratic + intersect + random,
        "x1": range(length)
    })

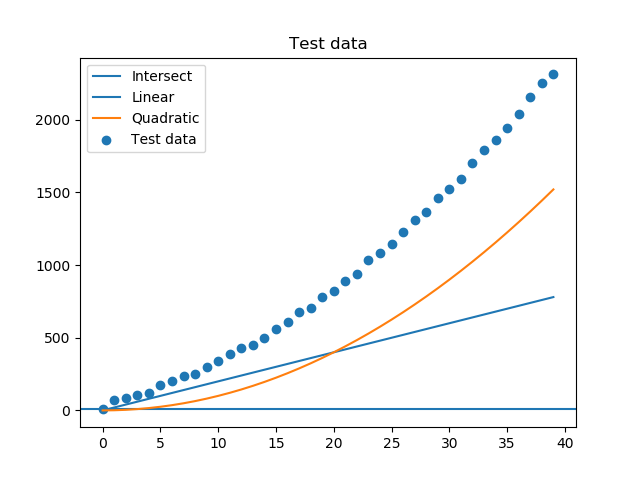
The test data and its components look like this:

Feature engineering

Lets assume, we want to fit the data with a linear and quadratic term (surprise, surprise). When using a linear model, you would provide a matrix where each column is one of the features. In our case this would mean writing a small script to fill a length x 3 matrix. Although it is no big deal it involves some lines of code and is not very readable.

With patsy we can write instead something like the following and let the matrices be generated by patsy:

1
2
3
import patsy
formula = "y ~ x1 + numpy.power(x1, 2)"
y, x = patsy.dmatrices(formula, df)

This will result for x in something like:

[[1.000e+00 0.000e+00 0.000e+00]
 [1.000e+00 1.000e+00 1.000e+00]
 [1.000e+00 2.000e+00 4.000e+00]
 [1.000e+00 3.000e+00 9.000e+00]
 [1.000e+00 4.000e+00 1.600e+01]
 ...

Fitting

With sklearn it is easy to do the fit:

1
2
3
4
import sklearn.linear_model
model = sklearn.linear_model.LinearRegression()
model.fit(x, y)
predicted = model.predict(x)

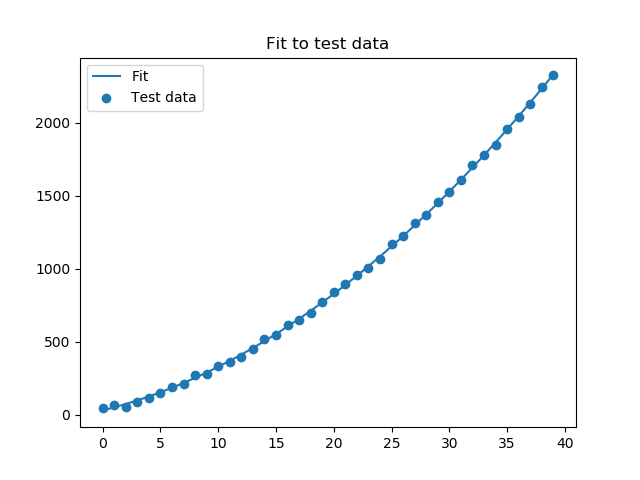
In the end, it looks like:

Fly me to the stars II: Explorative data analysis in Jupyter with python

What: Use Dygraphs within Jupyter notebooks
Why: Interactive explorative data analysis
How: Use jupyter_dygraphs for dygraphs plots within Jupyter

Installation

Jupyter_dygraphs can be easily imported directly from github:

1
pip install git+https://github.com/frankdressel/jupyter_dygraphs.git#egg=jupyter_dygraphs

Usage

Import the jupyter_dygraphs module into your notebook:

1
from jupyter_dygraphs import jupyter_dygraphs

Call the _dygraphplot_ function with dictionaries containing the pandas data frame and plot options:

1
2
3
4
5
6
7
8
9
jupyter_dygraphs.dygraphplot({
    'df': pandas.read_csv('https://moduliertersingvogel.de/wp-content/uploads/2018/05/temperatures.csv'),
    'options': {
        'title': 'Title for test plot',
        'xlabel': 'Date',
        'ylabel':
        'Temperature'
    }
})

Example plot

Further information

See github.

Bulk delete in CouchDB

What: Deleting all documents from Couchdb with a single command from the command line without deleting the database/design documents
Why: Truncate the database
How: Python3 and requests

Retrieve all documents

Couchdb has a rest api, which allows the retrieval of all documents from a database. To delete documents, the corresponding id and revision of each document is needed. Further attributes of the document can be ignored.

To retrieve all documents, a simple get request is enough, which will return a json document with an attribute rows which contains a list of ids and revisions of all documents:

import json
import requests

r=requests.get("http://localhost:5984/databasename/_all_docs")
rows=json.loads(r.text)['rows']

Set delete flag

Documents can be deleted from Couchdb by setting the attribute _deleted to true (for some subtleties see: this blog). Lets create the minimal information for deletion for each document:

todelete=[]
for doc in rows:
    todelete.append({"_deleted": True, "_id": doc["id"], "_rev": doc["value"]["rev"]})

Push changes

While all documents can be retrieved from the data base at once, it is also possible to submit multiple documents in one request:

r=requests.post("http://localhost:5984/databasename/_bulk_docs", json={"docs": todelete})

Make it user friendly

To make it a little bit more user friendly, the name of the database can be set as argument and the python script should be called from the command line. In the end it looks like:

#!/usr/bin/env python3
# coding: utf-8
import json
import requests
import sys

database=sys.argv[1]
if len(database)==0:
    sys.exit(1)

r=requests.get("http://localhost:5984/{}/_all_docs".format(database))
rows=json.loads(r.text)['rows']
print(len(rows))

todelete=[]
for doc in rows:
    todelete.append({"_deleted": True, "_id": doc["id"], "_rev": doc["value"]["rev"]})

r=requests.post("http://localhost:5984/{}/_bulk_docs".format(database), json={"docs": todelete})
print(r.status_code)

Have fun in extending the script and use it for maintaining your Couchdb!

German cities list

What: Extract a list of german cities and countries from wikipedia
Why: Get a list of german cities for text processing
How: Using Beautifulsoup, Requests and Python

Introduction

Wikipedia contains a list of german cities and towns. This list is formatted in html and needs to be processed for further automatic processing. Additionally, for each city the country is mentioned.

Code

Below is the python code for extracting the list. The url and the processing of the page specific search via Beautifulsoup is hard encoded. The wikipedia page uses a 2-letter encoding for the countries, which is mapped to the full country name.

import requests
from bs4 import BeautifulSoup

class CityList:
    def __init__(self):
        self.__countries={
            'BY':'Bayern',
            'BW':'Baden-Württemberg',
            'NW':'Nordrhein-Westfalen',
            'HE':'Hessen',
            'SN':'Sachsen',
            'NI':'Niedersachsen',
            'RP':'Rheinland-Pfalz',
            'TH':'Thüringen',
            'BB':'Brandenburg',
            'ST':'Sachsen-Anhalt',
            'MV':'Mecklenburg-Vorpommern',
            'SH':'Schleswig-Holstein',
            'SL':'Saarland',
            'HB':'Bremen',
            'BE':'Berlin',
            'HH':'Hamburg'
        }
        
    def retrieveGermanList(self):
        r = requests.get('https://de.wikipedia.org/wiki/Liste_der_St%C3%A4dte_in_Deutschland')
        soup = BeautifulSoup(r.content, "html5lib")
        
        cities={}
        tables=soup.find_all('table')
        for t in tables:
            lis=t.find_all('dd')
            for l in lis:
                # All countries are in brackets after the city name.
                # Some cities are listed like: SN, Landeshauptstadt
                countryShort=None
                additional=l.contents[1].split('(')[1].split(')')[0].strip()
                if ',' in additional:
                    countryShort=additional.split(',')[0]
                else:
                    countryShort=additional
                cities[l.find('a').contents[0]]=countries[countryShort]
                
        return cities

The code can be tested via the following snippet, which can be embedded as self test in the same script, where the CityList class is defined.

import unittest

class TestCityList(unittest.TestCase):
    
    def setUp(self):
        self.__out=CityList()

    def test_retrieveGermanList(self):
        self.assertEqual('Sachsen', self.__out.retrieveGermanList()['Dresden'])
        self.assertEqual('Sachsen', self.__out.retrieveGermanList()['Görlitz'])
        self.assertEqual('Bayern', self.__out.retrieveGermanList()['München'])
        self.assertEqual('Hamburg', self.__out.retrieveGermanList()['Hamburg'])

suite = unittest.TestLoader().loadTestsFromTestCase(TestCityList)
unittest.TextTestRunner().run(suite)

Usage

Use it from within python:

CityList().retrieveGermanList()

The output will be something like:

[...,
'Vohenstrauß': 'Bayern',
'Neuötting': 'Bayern',
'Eggenfelden': 'Bayern',
'Gernsheim': 'Hessen',
'Braunsbedra': 'Sachsen-Anhalt',
'Tegernsee': 'Bayern',
...]

Debugging in Jupyter notebook

What: Debugging directly in a Jupyter notebook while it is executed
Why: Faster/more secure development
How: Using ipythons build-in debug functionality

Note: The following is a modified version of the following blog entry: https://kawahara.ca/how-to-debug-a-jupyter-ipython-notebook/.

Insert debug statement

The following line needs to be inserted at the location in a cell where you want to start debugging:

from IPython.core.debugger import Pdb; Pdb().set_trace()

Start debugging

Execute the cell. You will get a debug prompt. It behaves like an ipython shell. The following commands can be used to operate the debugger:

  • q: Quit and stops the programm execution
  • c: Continue to the next breakpoint
  • n: Go to the next line

Happy debugging!